Automating CVE Remediation with RapidFort and Cloud Build
After years of working with developers, one theme is consistent: they want to focus on writing code and shipping features. In modern CI/CD pipelines, a container image scan runs immediately after build and will block the pipeline if critical CVEs (vulnerabilities) are found. While this is an essential, non-negotiable safeguard, it often leaves developers or platform engineers digging through vulnerability reports and fixing packages before they can move forward - time that could otherwise be spent on feature delivery.
Where things get more complicated is at the team and organizational level. In some companies, developers are expected to remediate vulnerabilities themselves and treat it as part of owning their code; in others, the responsibility falls on platform or security teams. Neither model scales cleanly. The result is friction: developers feel slowed down, and platform teams feel overloaded. This is more than a technical problem - it’s a cultural one. Automating image hardening and attack surface reduction can remove much of this tension, allowing both groups to focus on their strengths while still raising the overall security baseline.
This is where RapidFort comes in. Rather than stopping at image scanning and Software Bill of Materials (SBOM) generation, RapidFort profiles a container image to understand exactly what it does and determines the minimal set of libraries required for the application to operate. By integrating directly into CI/CD systems such as Google’s Cloud Build, this automation streamlines remediation, reduces attack surface, and delivers secure, production-ready images with minimal developer or platform team involvement.
Extending Scanning with Profiling and Hardening
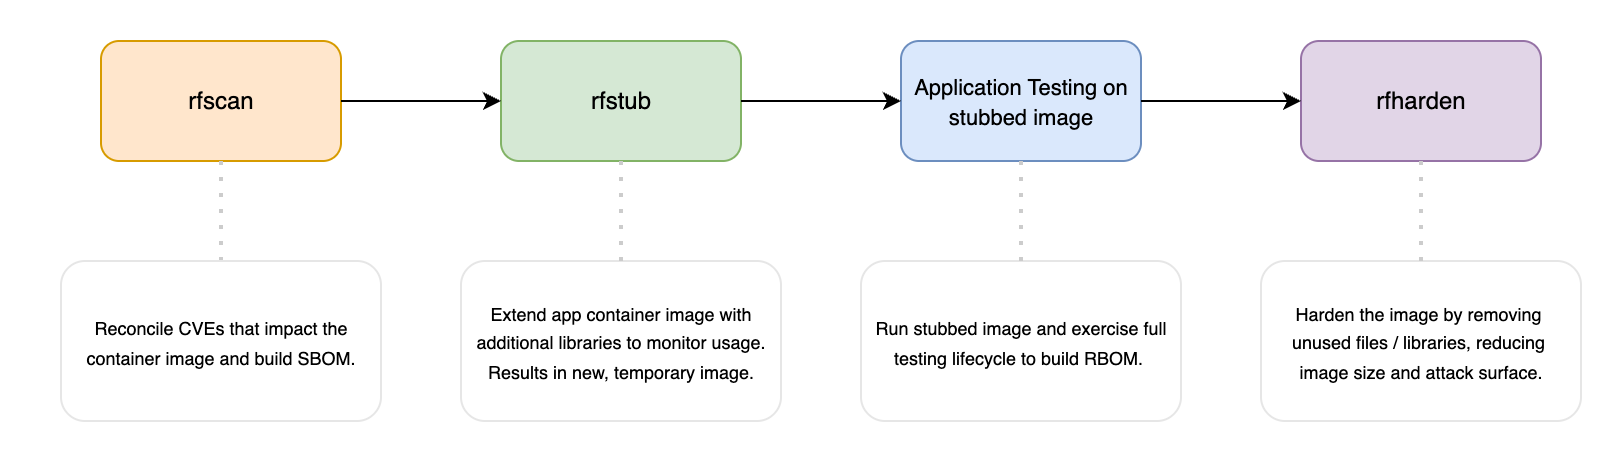
Scanning shows you what’s wrong; profiling and hardening actively make it better. By learning what the application really uses inside a container image, RapidFort can discard the rest - shrinking the attack surface and producing a leaner, more secure build.
- rfscan - RapidFort’s scanner reconciles CVEs across multiple scanners that impact the container image. It also builds a Software Bill of Materials (SBOM) for the image and file list.
- rfstub - Stubbing where the container image is profiled. A new derivative of the image is created with additional monitoring to determine which libraries / files the application actually uses and which can be discarded. The output is a new container image.
- Testing - With a stub image created, the stubbed image should be run and the application put through its full testing lifecycle. This is where the profiling happens and a Runtime Bill of Materials (RBOM) is generated.
- rfharden - The final step in the process builds a new container image with only the required libraries, resulting in a smaller container image with fewer libraries and a reduced attack surface. This, in turn, lowers the number of existing CVEs and reduces the chance of future CVEs impacting the application.
A Developer’s Journey
To demonstrate how RapidFort’s tooling works in practice, I’ll use a simple Python-based FastAPI application that I’ve started featuring in demos. The app is intentionally lightweight - it exposes a few endpoints and interacts with a SQLite database - but it’s complex enough to illustrate the concepts clearly. If you’d like to follow along, the source code is available in one of my GitHub repositories.
The container image for this application is built using a two-stage Dockerfile, both stages based on the slim Debian Python 3.13 image.
Note: I chose Debian-based here because of how common it is over Alpine when it comes to Python images. Alpine uses the
muslC library and years back, did not support wheels which meant many common libraries like Pandas, matplotlib, and grpcio had to be built from source - resulting in slower build times and larger images. This is less of a concern now and I’d suggest starting from Alpine if possible. This will result in an even smaller image size and likely less vulnerabilities.
# Dockerfile

ARG PYTHON_VERSION=3.13

# === Build Stage ===
FROM python:$PYTHON_VERSION-slim-trixie AS builder

RUN python -m venv venv

ENV PATH="/venv/bin":$PATH

COPY requirements.txt .

RUN pip install --no-cache-dir -r requirements.txt

# === Runtime Stage ===
FROM python:$PYTHON_VERSION-slim-trixie

WORKDIR /app

COPY app/__init__.py app/main.py ./

COPY --from=builder /venv /venv

ENV PATH="/venv/bin:$PATH" \
    PYTHONUNBUFFERED=1 \
    PYTHONDONTWRITEBYTECODE=1

USER nobody

EXPOSE 8000

CMD ["python", "main.py"]
1. Scanning the Image (rfscan)
The first stage in the process is to build and scan the image. In this case, the image is just under 240 MB, includes 135 total packages (OS and Python combined), and contains 3 vulnerabilities. That’s a solid baseline - starting with a slim image drastically reduces size, and having only 3 vulnerabilities, none of which are critical or high, is an excellent foundation to build from.
Note: I’ve redacted some of the output for legibility.
$ rfscan fastapi-demo:latest
...
Scanning SBOM for vulnerabilities ...
[0s]:     Downloading remote resources to the server... [100.0%]
[0s]:     Creating vulnerabilities report for fastapi-demo:latest...
[0s]:     Uploading results to remote storage... [100.0%]
__________________________________________________________________

Image Name:                  fastapi-demo:latest
Image Size:                  239.06 MB
Attack Surface:              239.06 MB
Runnable Attack Surface:     223.51 MB
__________________________________________________________________

OS:                          Debian GNU/Linux 13 (trixie)
Total Packages:              135
          dpkg:              87
        Python:              47
        Binary:              1
__________________________________________________________________

Total Vulnerabilities:       3
      Critical:              0
          High:              0
        Medium:              0
           Low:              1
       Unknown:              2
----------------------      ----------
      Exploits:              0
         Fixes:              1
          KEVs:              0
   RF Advisory:              26

..................................................................

Improvement estimates -- if hardened:
Attack Surface:               239.06 MB -> 45.87 MB   ~81%
 Package Count:                     135 -> 28         ~79%
   Vulns Count:                       3 -> 1          ~75%
__________________________________________________________________
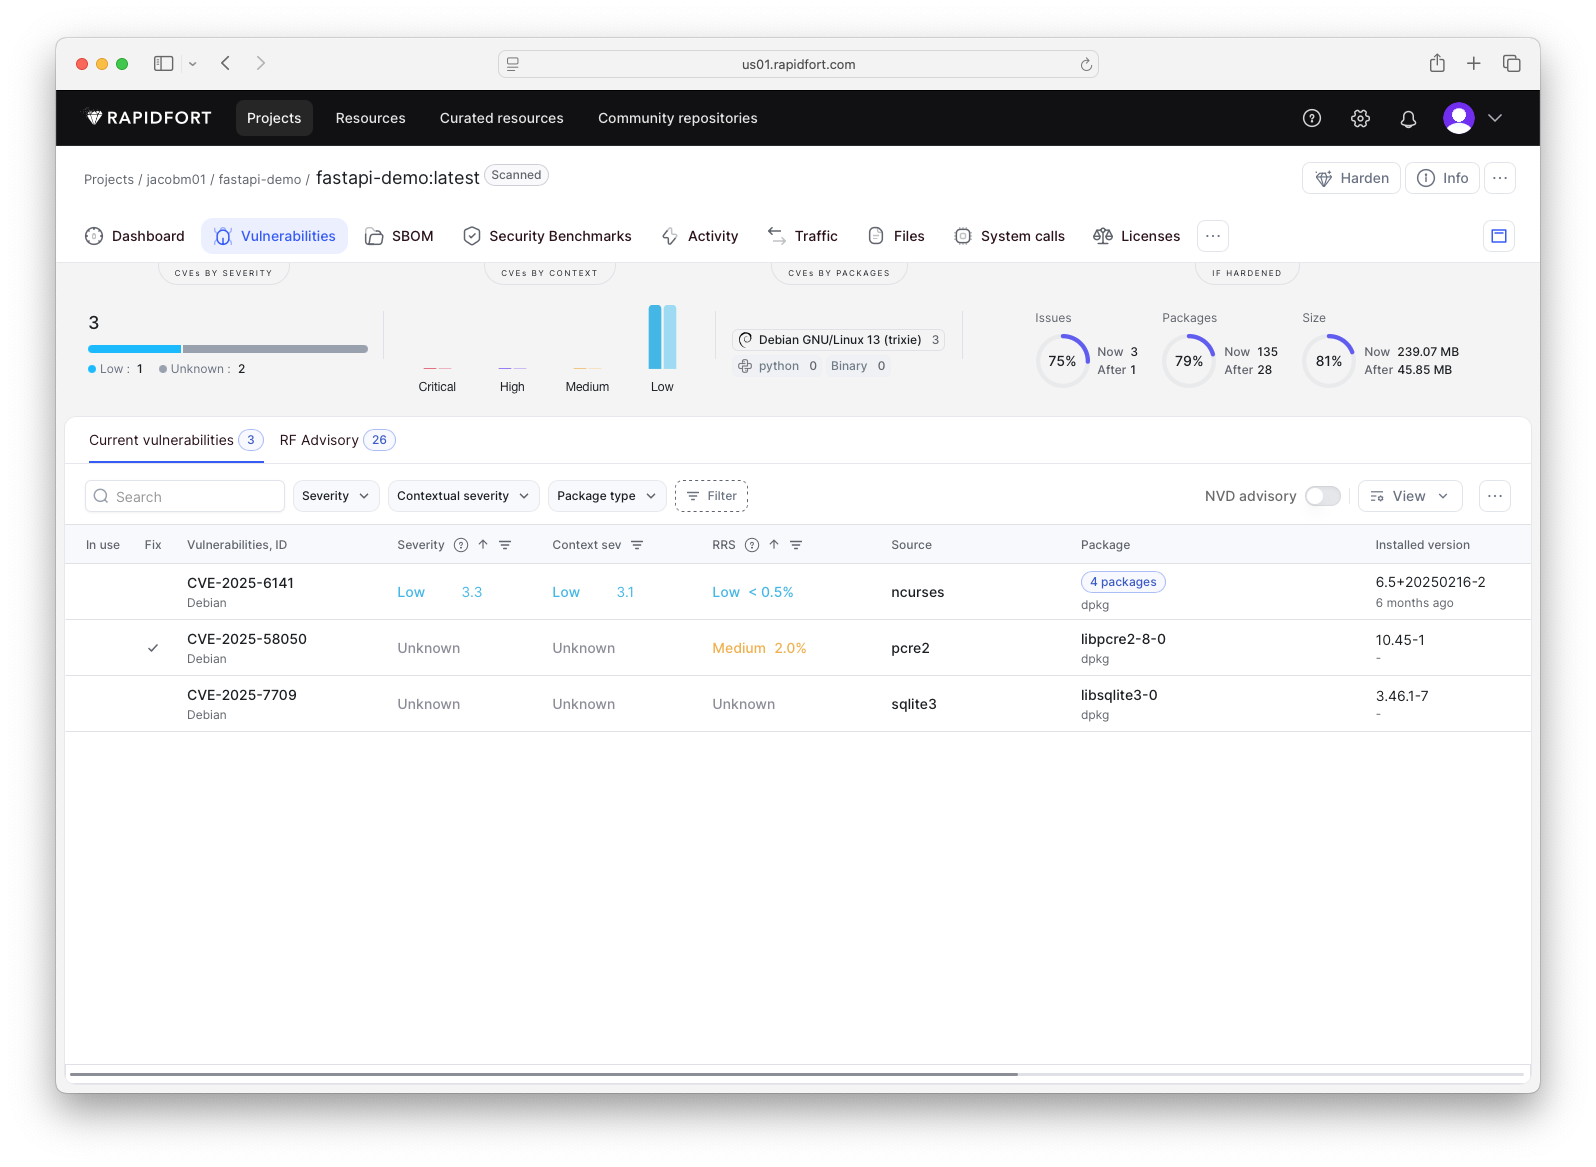
Switching over to the web UI provides a more detailed view of the scan results. Here, I can explore the generated SBOM, review the full list of discovered vulnerabilities, and drill into specifics that some users may find easier to do than in the CLI.
2. Stubbing the Image (rfstub)
The next step is to stub the image. This is also run from the command line, as shown below:
$ rfstub fastapi-demo:latest
The output will be similar to the initial scan, but this time a new image is created and pushed to the local registry. Notice that the stubbed image is larger than the original. This is expected as additional monitoring components are injected into the image to profile the application.
$ docker images --filter "reference=fastapi-demo"
REPOSITORY     TAG             IMAGE ID       CREATED          SIZE
fastapi-demo   latest-rfstub   9ff8b034b506   56 seconds ago   459MB
fastapi-demo   latest          bd72a2aee471   2 hours ago      243MB
3. Profiling the Application via Tests
At this stage, the stubbed image should be exercised with the application’s full test suite. This ensures all components are triggered, allowing the profiling process to capture an accurate picture of what the application actually uses.
For this Python example, I use pytest to run the tests against the stubbed image:
$ docker run -p 8000:8000 -d --rm fastapi-demo:latest-rfstub
29642222b2130efde0a137d547ed8dc90ecbff9e6de9dd4b7598d85f778959fd

$ pytest test_main.py
..                                                                       [100%]
========================== 6 passed in 0.43s ==================================
4. Hardening the Image (rfharden)
Once testing is complete, RapidFort tooling uses the RBOM profile to harden the image. As shown in the output below, the image size shrinks significantly, and vulnerabilities are reduced from 3 down to 1 without having to modify the Dockerfile or source code.
$ rfharden -pad no fastapi-demo:latest-rfstub
__________________________________________________________________

Image Name:                  fastapi-demo:latest
Image Size:                  239.06 MB -> 73.86 MB
Attack Surface:              239.06 MB -> 66.50 MB
Runnable Attack Surface:     223.51 MB -> 65.72 MB
__________________________________________________________________

OS:                          Debian GNU/Linux 13 (trixie)
Total Packages:              135 -> 46
          dpkg:               87 -> 14
        Python:               47 -> 31
        Binary:                1 -> 1
__________________________________________________________________

Total Vulnerabilities:       3 -> 1
      Critical:              0 -> 0
          High:              0 -> 0
        Medium:              0 -> 0
           Low:              1 -> 0
       Unknown:              2 -> 1
----------------------      ----------
      Exploits:              0 -> 0
         Fixes:              1 -> 0
          KEVs:              0 -> 0

..................................................................

Original estimates:
Attack Surface:               239.06 MB -> 45.87 MB   ~81%
 Package Count:                     135 -> 28         ~79%
   Vulns Count:                       3 -> 1          ~75%
__________________________________________________________________

Hardening finished for fastapi-demo:latest
Hardened image name is fastapi-demo:latest-rfhardened
   Started        : 2025-09-08 21:14:41,364
   Finished       : 2025-09-08 21:15:03,372
   Elapsed        : 22s
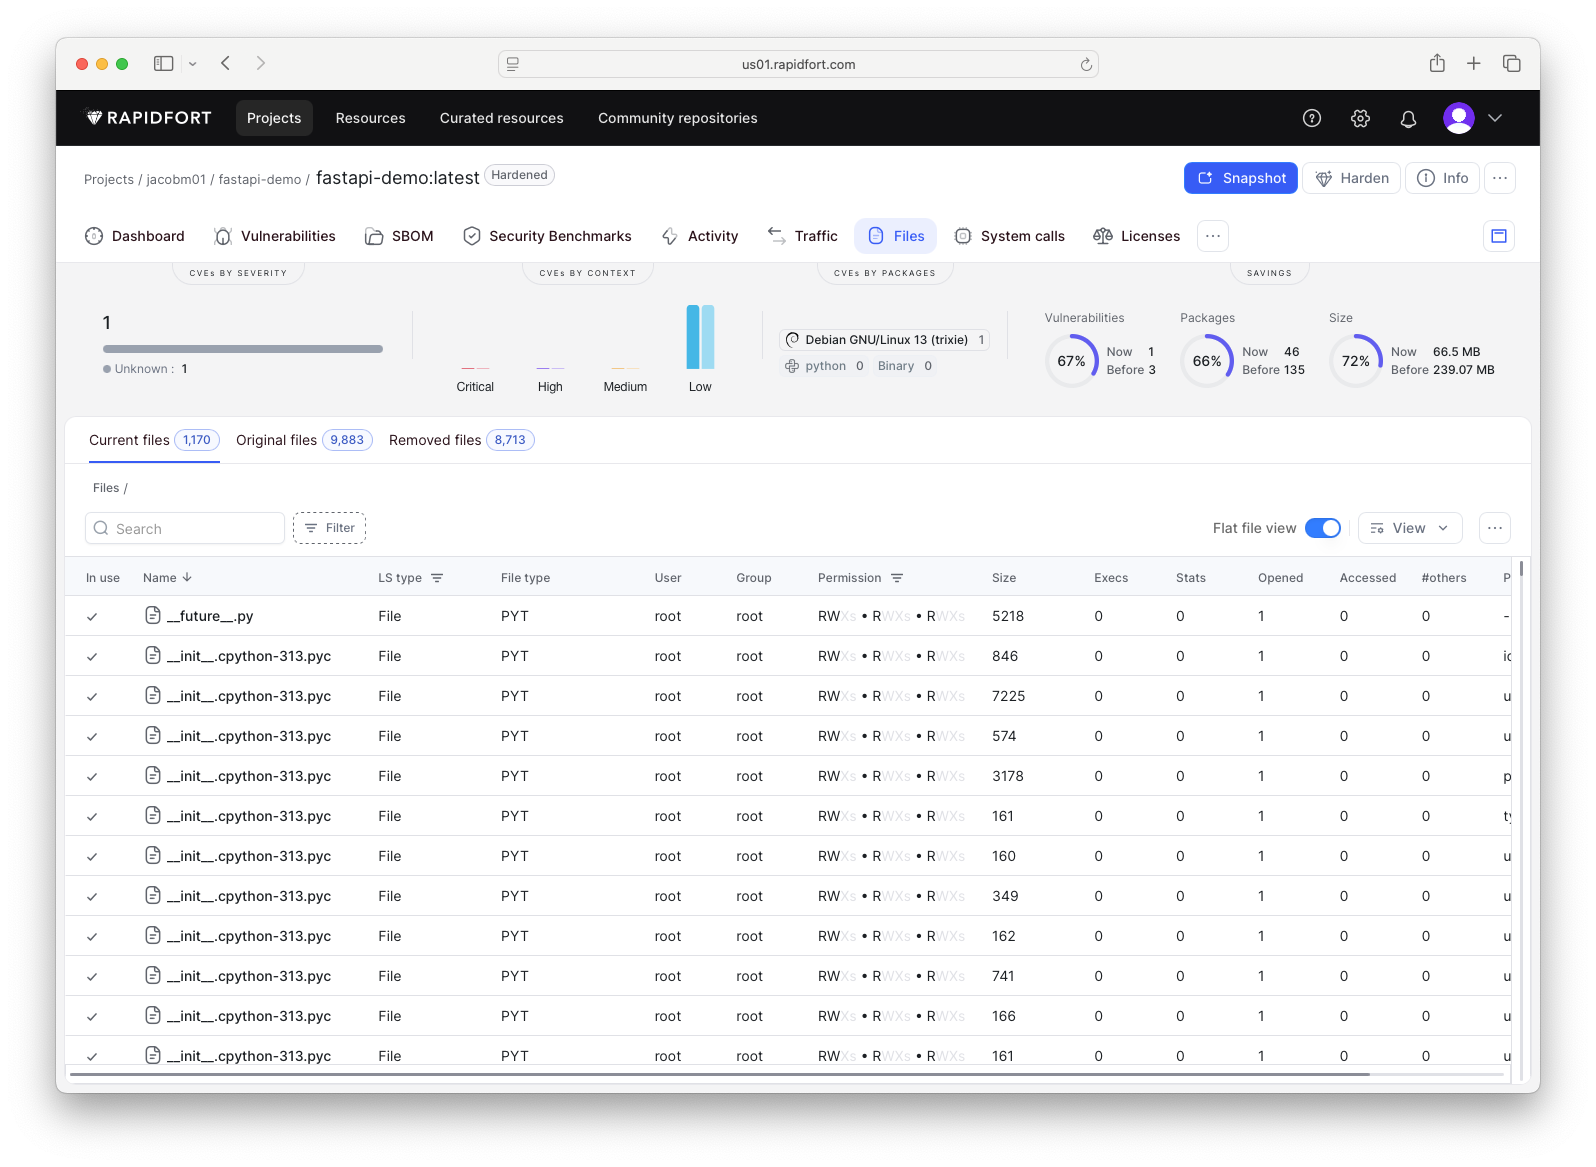
Switching back to the web UI, a new page now appears for the hardened image. It contains the same set of tabs as before, but the Files tab is worth highlighting. The hardened image reduced the total number of files from 9,883 to 1,170. These files were never touched during runtime and were therefore identified as unnecessary. Removing them not only reduces image size but also reduces the attack surface by eliminating paths for vulnerabilities to exist.
A Pipeline Approach with Cloud Build
To demonstrate how this process can be automated end to end, I’ve included a Cloud Build manifest in the GitHub repository. It orchestrates all the steps above - scanning, stubbing, testing, and hardening - and pushes the resulting hardened image to Artifact Registry.
By embedding these steps directly into a CI/CD pipeline, every image that moves through the pipeline is automatically scanned, profiled, and hardened before it lands in the registry. This guarantees consistent, repeatable outcomes across environments, while removing the manual burden from developers and platform teams.
In practice, the manifest defines the following steps:
- Run
rfscanto reconcile CVEs and generate an SBOM - Create a stubbed image with
rfstub - Execute the application’s test suite against the stubbed image
- Run
rfhardento produce a smaller, hardened image with a reduced attack surface - Push the final image to Artifact Registry
A full example can be found here.
Conclusion and Final Thoughts
Before closing, it’s worth emphasizing: there is no silver bullet when it comes to shipping secure software. Development teams are still responsible for maintaining an up-to-date codebase and prioritizing dependency upgrades. Put bluntly, trying to harden an image that runs an outdated Java 8 application will still produce unsatisfactory results.
That said, introducing RapidFort’s automated hardening capabilities with CI/CD tools like Cloud Build is a major step forward. It makes container security more accessible and far less burdensome, while delivering measurable improvements in security posture.
Key benefits include:
- Reduced developer friction: Teams can focus on building features instead of manually remediating vulnerabilities.
- Consistent security outcomes: Automation ensures that best practices are applied uniformly across all container images.
- Significant attack surface reduction: Removing unused libraries and files eliminates entire categories of potential exploits.
- Smaller, more efficient images: Hardened images deploy faster, consume fewer resources, and are easier to maintain.
I believe the future of container security lies in this type of intelligent automation - tools that understand application behaviour and can make informed decisions about what is truly necessary for an application to run.